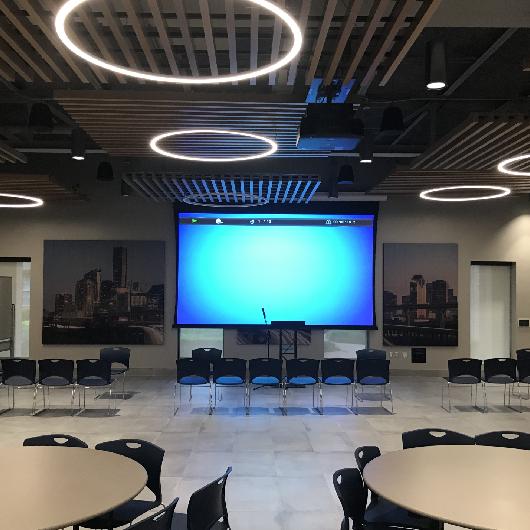
Did you walk into a conference space or home theater and thought “Wow, everything just works seamlessly”? This is the beauty of professional av installation. Audio-visual systems aren’t only “extras” — they’re indispensable for classrooms, offices as well as entertainment areas. The right AV setup provides clear sound, clear pictures, and effortless control across all devices, making events, meetings, and even events easy.
A professional installation involves more than the simple task of connecting wires. It’s about knowing your area and deciding on the best equipment and then integrating it all to create a seamless system. Let’s go over the steps in this procedure.
Planning Your AV Installation
Assessing Your Space and Requirements
Each successful installation for AV starts by establishing a strategy. Before you begin, consider the room or space where the equipment will be placed. Do you want to install a conference space, an auditorium or a classroom that is interactive? The size of the room and the lighting, acoustics and seating arrangement helps decide the design and layout of the equipment.
Choosing the Right Equipment
When the room is analyzed then it’s time to choose the right equipment. From microphones and speakers to projection and display units it is important to match the equipment with your budget and needs. It is crucial to select compatible equipment as a system that is not compatible could cause problems later on.
Designing the System Layout
Audio System Design
An excellent AV system is based on audio. The proper positioning of speakers will ensure that the sound is clear and without any echoes or dead areas. Professional audio engineers use acoustic mapping in order to place speakers in the best position for greatest sound quality.
Video Display and Digital Signage Layout
The next step is video. If you’re planning to install a projector or LED screen or even a wall of video in the right place, it’s important. In the case of businesses, adding the digital signage program will transform screens into information hubs that are dynamic that display schedules, announcements or other promotions at a moment’s notice.
Wiring and Connectivity
Structured Cabling Best Practices
Behind the scenes, clear and well-organized wiring can make all the distinction. A structured wiring system ensures that signal transmission is secure and makes it easier to upgrade the system in the future. The labeling of every cable helps avoid confusion, and makes the system in good order.
Power Management and Safety
An AV system that is professional and reliable cannot be enough without the proper distribution of power. Power conditioners, surge protectors and dedicated circuits protect the equipment from electrical problems and minimize the amount of downtime.
Installing Audio Equipment
Speaker Placement and Calibration
Speakers don’t appear randomly. A proper height, angle and distance guarantee a well-balanced audio. Tools for calibration measure output and assist in altering levels in order to prevent the distortion and echo.
Microphones and Sound Control
Mics are also crucial. Selecting the appropriate type of microphone -such as wireless, lavalier or even boundary mics as well as testing for interference, ensures that voices are clearly heard without any feedback.
Installing Video Equipment
Display Screens, Projectors, and Video Walls
The installation of video displays requires accuracy. The projectors must have precise throw distances and LED walls require alignment to ensure smooth visuals. Professional technicians test each screen to ensure consistent quality.
Introduction to Digital Signage Software
Digital signage software provides the control layer and interaction. It lets administrators plan content, control different displays, and then update information in a flash, making basic screens into communications powerhouses.
Integrating Control Systems
AV Control Systems Overview
Control systems function as the heart of the AV system. They allow you to manage many devices through the same interface, regardless of whether you’re using a touchscreen, an iPad, tablet, or even a mobile phone.
Streamlining Automation and Ease of Use
Automation streamlines operations. Through pre-programmed settings users can change between various modes of presentation, alter the volume and also control lighting with no need to interact with the devices.
Testing and Calibration
Audio Testing Techniques
The testing ensures that the system is operating exactly as it was designed. Professional audiologists check for an even distribution, remove feedback and then adjust EQ settings to improve clarity.
Video Calibration for Optimal Display
The process of video calibration involves accuracy in color along with brightness, color, and alignment tests. It is the goal of making images clear, vivid and consistent across all screens.
Troubleshooting Common Issues
Audio Interference Solutions
Do you hear buzzing, or do you have dropouts? The cause is usually interference. A proper grounding system, shielding cables as well as adjusting frequency settings can fix most audio issues.
Video Signal and Connectivity Fixes
The most common causes of video problems are problems with connections that are loose, resolutions that are not compatible or damaged cables. Making sure that each connection is checked thoroughly ensures an uninterrupted video signal.
Maintenance and Upgrades
Regular System Checks
After installation, routine maintenance ensures that systems are operating in the best way possible. Making sure connections are clean, washing equipment as well as updating software keep tiny issues from becoming major difficulties.
Planning for Future Expansion
Technology evolves quickly. The best-planned systems allow installing new display options as well as upgrading audio or adding new software, without needing an overhaul completely.
Conclusion
The installation of professional AV systems is much more than just an engineering task. It’s focused on creating a complete as well as seamless user experience. From arranging and choosing the right equipment to wiring, calibration and ongoing maintenance, every stage is essential to ensure that the system performs perfectly. Installing professionally ensures the audio and video installations will have the greatest impact regardless of whether you are in a business office or classroom location.
FAQs
1. What’s the standard length of time required for professional installation of AV?
The time for installation varies based on the complexity of the system. It can be anything between a couple of hours for smaller installations to several days for larger-scale installations.
2. What if I could build an AV system on my own?
Although DIY installation is feasible, professional installation will ensure the correct calibration, safety and reliability for the long term.
3. What can digital signage software do to enhance communication?
It provides live updates in real time, content scheduling as well as central control over several displays, which makes messaging efficient and quick.
4. What are the essential equipment needed in a conference room’s A/V equipment?
Essential equipment includes a projector or screen, speakers, microphone, a control panel and the structured cabling.
5. What is the recommended frequency for AV systems?
check-ups every 6-12 months can help to keep the system running smoothly, avoid breakdowns and prolong equipment longevity.


India's economy has been growing at a rapid pace in recent years, and it is now one of the fastest-growing Read more

Water tank pumps are an integral part of various residential, commercial, and industrial applications. Their primary role is to ensure Read more
Relocating from one home to another is one of life’s biggest challenges. Whether you are moving within the same city, Read more


Memahami risiko dalam taruhan di platform seperti login ceriabet adalah langkah awal yang krusial sebelum memutuskan untuk memasang taruhan. Banyak Read more